
Ratchet & Clank 3: 1108 Beta Notes & Research
Entry posted by McJobless ·
2,932 views
EDITS TO MAKE:
-
Segments define the state of a level (specifically Enemy and Crate placement), based on player data when they first load in. For example;
- Major Segment = First time you go through a level
- Minor Segment = Less crates, less bolts to prevent bolt farming
- 3 Invisible Difficulty Levels that you can be on (Easy, Medium (Normal, Default), Hard), likely tied into segments (Note: Difficulties were only switched for future levels), with Challenge Mode locked to Hard mode no matter what
-
-
Every time you fail at a boss in RC2, the boss has less total health the next time around.
-
We measured everything in meters on these games because that was the default unit in Maya. The way you can tell how many units something is is that a single crate is 1x1x1 Ratchet is approximately 2.5 meters tall.
-
Ratchet & Clank -> Z-Up
Specifiy planes for chunks and for water
the engine originally worked that you specified a plane, and that anything below the plane was assumed to be underwater (and would trigger water animations and effects).
QuoteCan enable/disable guns from the weapon menu (probably pressing the wrong button)
-> There appears to be a different "Hero State" for the airdrop gameplay, which locks you into a specific area
Bookmark: Programmers can place "bookmark" locations which allows them to skip back to places, but it doesn't work as it requires a developer kit.Those numbers are difficulty tuning information...could be the ones that appear specifically when tuning is enabled Part 2 - 6:20
Hero Pos: x0y0z0 = Actual world position
Tuning Menu:
nme = enemie segement (number)
Difficulty tracking; how many times he's died, enemies killed
->Changes other values, won't change anything in this current loaded level, but there will be repurcussions in the future levelsMovie -> Record gameplay videos on a dev kit
Minor -> Tricks game into thinking you're in the Minor segement
Mining
-> Limiting how many bolts you can get in a Minor segement
-> Reduces the number of bolts you get over time (seems like it works at the level total?)Levels won't run unless Ratchet's ship exists in the level
Game only works (will crash) if Ratchet stays inside the positive quadrantFog works, but is mostly used in Aquatos
->Near Distance sets how close you need to be to start seeing fog
->"int" = intensity
->Use the right/left triggers (L2 R2)Space Combat was prototypes, going to be like the Gummi Ship fro KH2
Post Effects -> effects that are applied after the whole scene is rendered
Bloom: Makes bright colours fuzzy (like neon light effect)
Arcade effect: Potentially DoF? Only for start of the level, looking into the distance
The Skybox is a giant sphere, which is also centered on the player character. It sorts behind everything, so nothing renders behind it.
QuoteMoby: (Mobile Object) A moveable entity that has code attached to it (including enemies, crates, breakables, vendors etc)
Tfrag (Tessellating Fragment) Composed of a collection of tface tris & tface quads. Static, non-instanced (unique) background. The tfaces of a level were broken up by the tools into tfrags based on stripping and Vector Unit memory size constraints. Tfrag geometry indexed a 1024 color palette for corner color lighting.
TIE (Tfrag Instance Engine) Instanced: one model (the prototype) drawn multiple times, using a different matrix and lighting per instance. Prototype modeled as tface tris & quads. Placed in a Maya scene file using ref nodes. Ref nodes could be viewed expanded or collapsed using custom Maya plug-ins. Each instance was lit individually, but was then mapped to a single 128 color palette per prototype.
-> Because of the train in R&C2, TIEs had to eventually become moveable.
Shrubs :
Shrubs Used for more than just plants. Fast renderer for rendering small details. Data format closely matched what GS used to draw. Instanced (one model drawn multiple times). Prototype modeled as tris and quads. Placed in a Maya scene file using ref nodes. A special Maya plug-in could also be used to “randomly” populate an area of ground with shrubs. Each instance had a color multiplier used for lighting.
-> (Don't occlude by default, must be set specifically to occlude)
Shrubs (cont) :
Shrubs (cont) Supported effects: Opaque Translucent Could become a single quad “poster” in the distance (far level of detail). Becomes translucent and fades away in the distance. An instance could sway in the breeze using a manipulation of its transformation matrix.
->R&C is divided up into cubes (Cuboids?); depending on which cube the camera is in, the game is set to occlude specific objects based on what you should and shouldn't be able to see. This is based on some pre-computing.
->Due to the TFRAG system, the game automatically tesselates up/down the detail of objects based on the camera's distance. If you get far enough away, the object is not drawn at all.
Occl (Generally not run on beta builds, so the occlusion system was not set correct)
-> Active: Default, occludes objects based on your position in the world
-> Off: Turns off occlusion, renders everything
-> Frozen: Freezes the state of occlusion for every object in the world
Profiler Bars: if it crosses the white bar to the right, the game is "breaking frame" (i.e. taking more than 16.66ms to render and going under the 60FPS target)
->Top line is the CPU, bottom line is the GPU
->Crates are the only mobys that use occlusion, if occlusion is broken, every crate in the game is displayed
Update - Parts = Particles
Mode: When going into Camera mode, it automatically disables all of the things in Update so you can view things, but you can manually renable things if desired
-> Ratchet (Moby 0) and the Wrench are technically mobys, but they separated in the debug menu so the devs could work with him separately
-> Helmet, Weapons and Wrench are separate mobys that are attached; won't follow in cam+chr mode
Fog (Doesn't appear to modify Skybox)
->NearDist: The distance from Ratchet where the fog should start (measured in meters, as per the default unit of Maya)
->NearInt: How intense is the fog when it starts (whispy/transparent vs. thick/opaque) as a percentage out of hundred?
->FarDist: How far through the fog before you can see
->FarInt:
Screen -> Small: Used to see what the engine is culling (for optimisation purposes)
But yeah, all that was set up manually by hand for those games. Enemies just had intro paths, patrol paths, firing points, and three sets of volumes that described their alert ranges. Those were set up by hand, one by one, by a designer or programmer.
Hi Shadow. When they're patrolling, or if ranged enemies are seeking spots to run to -- they're only going to pre-set waypoints. In the case of patrols, they just follow a path. In the case of firing waypoints, those would be set individually per enemy so that the enemies wouldn't clump up or run into each other. It was very difficult.
Major Segements = Segements (Enemy and Crate placements) for the first time you go through a level
Minor Segement = Less crates, less bolts to prevent bolt farming
It's hard to remember, but we had several ways of doing it. The base geometry was what we called T-frag. It had the limitation that no face could have more than 4 points. That's the stuff you saw morphing -- it had an automatic LOD thing. We also had Mobys and Ties, which were instanced. The LODs on that had to be done manually. Finally we had shrubs. They were all the tiny decoraction pieces with no collision. They LOD'd out to a billboarded quad, which I think was done automagically.
Shadows were done by creating pills and spheres in special volumes.
Shadow Volume Effects -> One example = the teleport, particles coming off Ratchet's head
We had a bunch of different tricks. On instanced objects, it was done by hand by swapping to lower poly models or billboards. On non-instanced objects the game would perform face reduction automatically based on your distance from it. Those had to be built a special way so that would work (no faces with more than 4 verts, and ideally none with less than 4 verts).
Every collision face in the game had collision flags on it. When it came to wall-jumps, there were three flags that you could set: "Wall jump", "No wall jump," and "one wall jump." If a surface was flagged for wall jump, you could jump back and forth in it. If it was flagged as "no wall jump, you couldn't wall jump off it at all. The default setting was "one wall jump" which meant you could wall jump off it once, but you couldn't combo it and keep jumping.
3 Invisible Difficulty Levels that you can be on (Easy, Medium (Normal, Default), Hard)
-> Changes enemy amounts, enemy damage amounts
-> The easier it is, the more health crates, the harder it is, the fewer health crates
-> If you died less than the coded values of deaths, you would move up
-> If you died more than the coded values of deaths, you would move down
-> The change only happens in future levels (it has to reload assets)
-> Challenge Mode/New Game+ was locked to the Hard difficulty level (tuning disabled)
Every Segement needs to give a specific maximum amount of bolts as specified by the designer (to ensure good progression)
-> Crates give the amount specified by a system which tracks how many bolts you're supposed to get
-> Breakables do not factor into these equations (because the equations rely on the specific ids for the crate mobys), these instead use a function called "Spawn Gravy Bolts" which spawn a reduced amount bolts which don't upset the economy (usually figures under 10)
Bolt Deficiet/Health Deficiet: The game keeps track of how many bolts get lost through the level (such as when an enemy dies outside of the geometry); on the next set of crates, the game attempts to make up the difference and payout
->50 bolt model: A complex algorithm to figure out the most satisfying, but also resource-aware bolt amount to spawn
Breakables may include the parts that fall off enemies when they die
To be specific, use the term "Occlusion Culling", so it's not confused with Ambient Occlusion, and mention that it was given to Naughty Dog by Insomniac
Weapon UPG 0 = Level 1 (0-indexed numbers)
UIDs; Only for mobys, and it appears that any moby which is 'static' (as in, is always loaded in memory for common objects like Ratchet and his ship), they are marked as UX (even though there would still exist instances of those objects?).
New cutscene text get! Detail all the info that appears when you press the Triangle button during a cutscene.
Display -> Darken's purpose was most likely to darken the background (the actual game) to make the displays (such as Text and UIDs) more easily readable. Not sure why it would be non-functioning in both beta builds (appears to not work in R&C1 and def doesn't in R&C3).
fb = frame buffer
Quotecmp = Completed (from Major)
maj = Major
min = Minor
Invinc Actually works, but Ratchet will still play damage notifications
Weapons -> DMG seems to be a factor
Setting XP value below last level upgrade will update the HUD with their actual maximum health, but they will have more than the bar
Tuning values:
In a Minor Segment, all enemies seem to share this same value;
FIRST NUMBER = SEGMENT
SECOND LOWERCASE LETTER = i (Purpose research below)
[In Veldin, this seems to break when you look at a Health kit with a '2i', although maybe it has data incorrectly assigned?]
Major Segment;
'-' (The Dash) indicates that an enemy doesn't have that bit of information assigned to them
Explosive Crates have ---
ASTERISK (IF IT APPEARS) = Most likely if the enemy's cuboid has been activated or not?
FIRST NUMBER = Segment number. This appears to be the segment in which the enemy *spawns* in; according to the developers, many enemys are always spawned in at the beginning of the level in a separate segment, and are then teleported over when they are needed
SECOND UPPERCASE LETTER = Between A, B and C, likely the Cuboid the enemy is linked to
THIRD LOWERCASE LETTER = Difficulty ('e', 'm' and 'h')
Interesting; Qwark is 5A-
Some of the tyranoids (one eye) on Marcadia have a Dash for the third bit
Showing:
-1 [Appears in every level]
A [Appears on Aquatos, Minor Segment]
Returned to Tyranosis, got 15, maj and h and then the tuning information wouldn't show...could "showing" be a tuning thing that disables that info?
Scene: press Circle to activate the selected cutscene, will attempt to load and play it, X to increase value, triangle to decrease value
Gravy Bolts also factor in enemies
Minor Toggle is irreversible once set, and cannot be used to reset a level to Major
That says XP DEFICIET, not HP
QuotegXX = Group ID, which designer-set group the item belongs to
oXXX = Object ID, basically the id of the file for that object
UXXX = Unique ID, unique ID for that moby in the level, UX for mobys which are always loaded in memory
Actuator = Vibration?
Battle Cam = Lock-Strafe Mode?
-> These appear in both the R&C1 and R&C3 betas...could it be possible they were disabled as the UI functionality existed? At least in R&C3's case?
>Decreases enemies, adds more crates
segment x y
x = Increases with every death
y = ???
Level 1 - Veldin
nme 0 = Enemy Segment [Changes 2 (nme+nme2), 4 (nme0+bf8+ref9), 8 (nme1)]
bat 2 = Battlefield Segment [Changes 2 (nme+nme2), 4 (nme0+bf8+ref9), 8 (nme1)]
Level 2 - Florana
nme 0 = Enemy Segment 0 (Beginning of Level until Checkpoint overlooking water) [Changes 2 (nme2), 4 (nme0+bf8+ref9), 8 (nme1), 9 (bld1+ne6+nw5)]
nme 2 2 = Enemy Segment 2 (From previous to Qwark cutscene) [Changes 4 (nme0+bf8+ref9), 8 (nme1), 9 (bld1+ne6+nw5)]
Level 4 - Marcadia
nme 0 = Enemy Segment
bf 8 = Battlefield Segment
ref 9 = Refactor/Puzzle Segment
Level 5 - Daxx
nme 6 = Enemy Segment
ape 4 = ??? Segment (path where you get the charge boots)
Level 7 - Annihilation Nation
gnt 0 = Gauntlet Segment
arn 1 = Arena Segment
Level 8 - Aquatos
nme 1 = Enemy Segment
Level 9 = Tyranosis'
bld 1 = ??? Segment (when you land with the rangers)
se 4 = South-East Segment
sw 3 = South-West Segment
ne 6 = North-East Segment
nw 5 = North-West Segment
Level 10 - Zeldrin Starport
nme 1 2 = Enemy Segment (???)
nme 2 6 = Enemy Segment (???)
blt 1 = Segment (???)
Level 11 - Obani Gemini
nme 1 = Enemy Segment
Level 12 - Blackwater City
bf 1 = Battlefield Segment
sky 0 = Sky-fall Segment (?)
Level 13 - Holostar Studios
nme1 0 = Clank Segments
nme2 4 = Ratchet Segments
grav 5 = Gravity Boot Segment
Level 16 - Metropolis
nme 0 = Enemy Segment
rbt 2 = Robot Segment (Boss Fight)
Level 18 - Aridia
bf 4 = Battlefield Segment
sky 3 = Sky-fall Segment (?)
Level 26 - Metropolis Battlefield
bf 5 = Battlefield Segment
sky 6 = Sky-fall Segment (?)
Level 29 - Tyranosis Battlefield
bf 0 = Battlefield Segment
sky 1 = Sky-fall Segment (?)
Completes = Number of Replays
ADD SCREENSHOT FOR MISSION DEBUGGER AND THE BLOOM DEBUGGERS
R1+R2+RightDPad Adds mission-related debuging text in Battlefield segments, can bug out and change the sort order of transparent textures to render in front and mess up ammo/bolt font
R1+R2+LeftDPad "Mission Unlock Cheat: On/Off", unlocks all Battlefield missions
Add sample/Add start fail to find the music files
open fail name ¥LEVELS¥LEVEL9¥occ_sample_deltas.dat;1
Unknown device 'host'
Unknown device 'host'
There's a deleted cutscene after using the telport after talking to Al to get the first Vidcomic
QuoteCamera Controls
->Pretty sure Mike Stout said there should be a way to rotate the camera up/down by holding a button. Couldn't find anything, need to research.
R1 = Up
R2 = Strafe-Lock Right
L1 = Down
L2 = Strafe-Lock LeftDPad-Up = Forwards
DPad-Down = Backwards
DPad-Right = Rotate Camera RightDPad-Left = Rotate Camera Left
Ratchet Camera Rotations;
-> Most likely using Radians
X = (Rolls around at 3.14)
Y = Max up/down is ±1.05
Z = (Rolls around at 3.14)
For Max HP
Current XP: 1802720
XP: 56335.0
-> Cleanly divides by 32. What's the significance of the XP value?
-> I can't find the XP value in memory with Cheat Engine, no matter what combinations I use. It's entirely possible that Current XP is the actual value, and that it's being divided by 32 to be displayed in the UI (smaller numbers easier to work with?), although it could also be stored in a combination of memory addresses.
vu1chain
max: Probably the max allocated on the currently loaded level
limit: Probably the upper-limit that can be assigned at one time
Check the Jetix Beta Footage; notice the "Occl" text in the bottom corner.
QuoteProgressive Scan
Interp = Most likely shows splines
Hold R2 and L2 and then press Up/Down on the DPad to rotate the camera up and down
R1+R2+DpadUp (Forward)/R1+R2+DpadDown (Back) = Toggles Pool Display. In the corner lists which pool you're debugging, and renders a bunch of lines from above Ratchet that point at the different enemies/allies (Rangers are part of the pool) inside the pool. Lines are coloured to represent their state according to the Pool Info display.
R1+R2+DpadRight = Toggles Mission Debugging Info. Empty, Mission Info Only (the top white bit), Mission Info & Pool Info (if Pool Display is active, the selected pool is coloured in yellow)
Pool = Different "pools" which hold different enemies.
Size = The total amount of entities in that pool.
Free = Unspawned, available. (Lines will point to random place in spawn as they exist in memory only)
Spawned = Entity exists and is running around in the world.
Dead = Mostly likely unused now; to save on memory, most enemies in missions never technically "die" and are simply sent back to the pool
Ready = Enemies who were "killed" and are awaiting respawn (Lines will point to random place in spawn as they exist in memory only)
Mission Unlock Cheat R1+R2+DpadLeft: Can be toggled in mission menus or ingame; unlocks all of the missions in a Battlefield segment
Enemies: Currently Spawned (Current Tuning) / Total Available (Untuned), both sides decrease on enemy death
Crates: Same thing, specifically for health crates
Veldin
Florana
Phoenix
Marcadia
Colliseum
Ocean Hideout
L8 Clank
L8 Mines
Tyranosis
Qwark1
Qwark3
QuoteEmpty Weapons could also be the Qwark weapons
Weapon Power (UI/Guide) = Damage (Debug Menu): 20pow = 1.0dmg
HP2 = For most weapons, the DMG Value on the next upgrade
HP1G seems to be the damage amount done by emitted bombs and stuff.
For example, the bouncer breaks into smaller balls
So HP1G controlls how much damage they do.
Unsure what HP2G is supposed to do, but I suspect HP2, HP1G and HP2G are all values that can be accessed from the game scripts and their purpose modified. Weapons like the bouncer do NOT use HP2 and simply increase by seemingly random numbers (potentially hinted at inside the game's compiled code), of if HP2 is listed, the value seems to be ignored. Hmm.
When a value is set to 0.01, you can press Circle to disable that value, which can't be re-enabled (Circle removes the decimal, and when a weapon value is set to "0", that value becomes locked).
QuoteThings to consider:
Memory addresses for the full game; note the odd values and the modes

--
Before I ship this information off to The Cutting Room Floor to be properly organised and displayed, I want a kind of online scratchpad that I and others can use to just jot down research notes.
https://tcrf.net/Proto:Ratchet_%26_Clank:_Up_Your_Arsenal
While the Debug Menu is open, the game is paused. The Debug Menu is marked as;
1106.0, 05:34:09 Aug 11 2004
For most pages, tapping Cross over a selected option goes forward/up in value, while tapping Triangle goes backwards/down. L1/R1 switches between Debug Menus. I've listed any options here, with the default one being the first in the list. The key to understanding this Debug Menu is to remember that every PS2-Ratchet game was essentially a hack of the previous game.
GLOSSARY OF TERMS
Not actually a menu, but just a list of commonly used jargon with definitions.
Mobys: Stands for Mobile Object. Refers to any moveable, dynamic object which has code attached to it. Common examples include crates, enemies and Ratchet himself.
Tfrag: Stands for Tessellating Fragment. A static object which is capable of dynamically tessellating (increasing or decreasing the amount of polygons that form the mesh) based on how close or far the player is. The main limitation is that no face could have more than 4 points/vertices (and presumably required more than one). Tfrags are mainly used for the main level geometry, and if a player gets too far away from a Tfrag, it is not rendered at all (due to the Occlusion system discussed below). This was a technology inherited from Naughty Dog.
TIE: Stands for Tfrag Instance Engine. As it says on the tin, this is an instanced version of a Tfrag which allows for cheaper rendering if the same Tfrag needs to appear multiple times in the one level. Despite being derived from Tfrags, supposedly these do not support automatic tessellation/LoDs and had to be done manually. Originally, these too were static, but in Ratchet & Clank 2: Going Commando, the giant train used on Planet Siberius required that TIEs could be made moveable/dynamic. Known examples aside from that include the Galactic Ranger Dropships in R&C3 (which are actually made from several ties). This is a technology inherited from Naughty Dog.
Shrub: An instanced object type used for small details that don't have collision. The LoDs were generated automatically, with the lowest detail being a simple 2D billboard quad (a flat polygon). As well as plants, other small detail objects used for decoration could be made as Shrubs. This is a technology inherited from Naughty Dog.
Parts: Shortened name for Particles. Particles are little objects that have several properties, such as colour, lifespan and movement data which be spawned by a Particle Emitter. They're used for all the special effects in the game, such as explosions, weapon muzzle flash and electric sparks.
Pill: A cylinder shape with spheres attached at each end, resembling a pill. These are one of the primitive shapes (others include cubes and spheres) that could be used for things such as collisions and shadows.
Spline: Also referred to as a Path. An invisible, curved line described by a series of points. Objects could be made to move along a spline. Most elevators and taxis move along splines.
Volume: An invisible box which some special behaviour can be tied to. For example, Shadow Volumes (a Naughty Dog-inherited technology) define a space for faked shadows to exist in, whereas trigger volumes can enable a script behaviour when the player touches them.
Cuboid: In Ratchet & Clank, enemies have multiple "alert states" that define how they are behaving in the current moment. These states include Attack, Alert/Search, Idle and so on. In order for enemies to determine which state they should be in, they check several radii; essentially, the further Ratchet is away from the enemy, the more relaxed that enemy's state is. Cuboids are special types of trigger volumes that are mainly used to tell the enemy to activate the radius checks so they can begin to figure out which animation state they should be in.
Chunks: As of Ratchet & Clank 2: Going Commando, a single level could be broken into individual chunks. To reduce the memory cost of having an entire massive level and all its segments in memory at one time, a developer could place a Chunk Plane, and anything above/below that plane would be in a different chunk; certain objects would remain in memory, but much of the geometry, music and so forth would not be loaded yet. You could then specific in the level when to load into the next chunk. Loading a chunk only took a fraction of the time as a full level-load, which is often represented in-game as a small pause with a black screen (the switch between the main Tyhrranosis hub and the boss battle), whereas level loads have special loading screens (such as Ratchet falling down the sewer pipe on Aquatos).
Segment: There are two uses of the term; from an in-game, technical perspective, this refers to a part of a level between checkpoints, and is used to set up moby (specifically crates and enemy) placements. By default, every Segment is set to be "Major" (MAJ), and will load all crates and enemies (although, this is modified by the current difficulty tuning level). When the player reaches the end of the segment, it is flipped to the "Complete" (CMP) state and no new mobys will be spawned in the segment. If the player reloads a level, all previously completed segments are switched to the "Minor" (MIN) segment, which loads only a small amount of enemies and crates, and also enables Mining Mode, which prevents the player from farming bolts by reducing the amount of bolts you can collect.
As far as design is concerned, a Ratchet & Clank level is divided in multiple paths with varying objectives/rewards for completion of each path (some required, some optional). To add variety to the levels, these paths (segments) can be designed as one of the following; traversal segments (platforming challenges with light combat), enemy segments (combat-intensive sections), mining segments (like the sewers on Aquatos, for grinding coins and experience) and puzzle segments (using a gadget with light combat). Every level generally contains at least two of the three, if not all.
Segments were very complicated with regards to bolts and difficulty; as far as bolts were concerned, every Segment needs to give a specific maximum amount of bolts as specified by the designer (to ensure good progression). When you kill and enemy or destroy a crate, a number of algorithms are run to generate the amount of bolts to give you to ensure you do not exceed this total while still getting a good amount per object. Breakables (other mobys placed in the level) do not factor into these equations (because the equations rely on the specific ids for the crate/enemy mobys), so instead these use a function called "Spawn Gravy Bolts" which spawn a reduced amount bolts which don't upset the economy (usually figures under 10). On the other hand, Difficulty is split between three modes; Easy, Normal and Hard, and the effects of these modes are complex (see the Tuning section later for more).
Skybox: Despite the name, the Skybox is a giant textured sphere that is centred on Ratchet's position (and thus moves with him). The Skybox is sorted first, and as such is always rendered behind everything else.
Occlusion Culling: A system used to determine what objects the camera can actually see, and only render those specific objects (more specifically, only render their visible faces). While Occlusion Culling wasn't new, Ratchet & Clank was most likely the first game on the PS2 to do it, and this technology was given to Naughty Dog by Insomniac Games. In Ratchet & Clank, Occlusion was precomputed and the process usually was left to run overnight; the system would separate the level into cubes, and then determine what was visible at every point of each cube. Because this process was painstakingly long, most alpha/beta builds did not feature proper occlusion to speed up the time it took to burn the game to disc for testing/demonstration. Futhermore, the Occlusion System only worked for non-moving/static geometry (Tfrags).
MAIN PAGE
Contains most of the useful options and information when debugging the game.
UPDATE
Enables/Disables updating of specific types of objects in the world. Disabled objects will not respond to input, but will still be visible/rendered.
- Ratchet [on | off]: The current player character. Technically a Moby, but separated in the debug menu for testing purposes. This only affects Ratchet himself; his armour, helment and other attachments still count as mobys, and thus will stay in place if Ratchet is moved while moby updates are disabled.
- Mobys [on | off]: Handles all moby objects in the level, including Ratchet's attachments, crates and enemies.
- Parts [on | off]: Deals with particle effects. When disabled, particles can still be generated, but they will not expire which usually leaves a hilarious massive cloud wherever the particles are being generated from.
- Camera [on | off]: The player's camera. If a cutscene plays while this is disabled, when the cutscene ends the screen will remain black as the camera cannot play its fade-in animation.
- Step [off | on]: When enabled, the game will appear frozen; tapping the L3 button will step forward one frame at a time.
vu1chain
While not editable, it has some info about how the VU1 (Vector Unit, one of the PS2's units for doing vector math) is being used at any given time.
- max: Appears to be the maximum amount of memory that was allocated since level load.
- lim: Appears to be the hard limit of memory that the level is allowed to allocate for VU1.
MODE
Controls general settings for the game, such as how it renders.
-
Control [normal | camera | cam+chr | volume]: Sets the current control mode, which has the side effect of flipping on/off the Update switches (which can still be manually modified).
- normal: The default mode. All Update switches are turned on (aside from Step) and the game controls like normal.
- camera: Detaches the player character from the camera and allows you to fly through the level. L1/R1 control Height, L2/R2 move horizontally, Dpad-Up/Dpad-Down move forward/backward, Dpad-Left/Dpad-Right rotate the camera in the selected direction, and holding both L2 and R2 with either Up or Down on the Dpad will rotate the camera up and down. Disables all Update switches.
- cam+chr: Exact same as Camera Mode, but leaves the player camera attached to the camera. This allows you to place the character anywhere in the level. By default, all Update switches are disabled; enabling Moby Updates will allow you to activate checkpoints and other triggers without most types of enemies noticing you (and those that do cannot damage you), which is useful for studying the tuning info.
- volume: Same as Camera Mode, but enables both Mobys and Particles while leaving the player character disabled and detatched. Useful for viewing the level without triggering any additional behaviours.
- Profile: See the "Profiler" section below.
-
Occl: [active | off | freeze]: Sets the current Occlusion Mode. Occlusion Culling was, for the most part, properly precomputed in this beta, so it's still possible to view how these modes work.
- active: Normal. Objects that are not within the view frustum or are too far away (according to the Draw Distance option below) are not rendered.
- off: All objects in the level are rendered regardless of where the camera is. Can be incredibly slow (and may even crash) in particularly heavy levels, like the Aquatos Sewers.
- freeze: Freezes the occlude state of objects when this option is set. This lets you move around the level to get a better view of how everything was occluded when the camera was in the original position before you set freeze on.
- Bookmark: [off | on]: Originally, programmers could place "bookmark" locations with this setting, which allowed them to skip back to places, but it doesn't work as it requires a developer kit.
- Invinc: [off | on]: Toggles Invincibility on and off. Ratchet will still play damage reactions, but his health will not decrease.
- Draw dist: [normal | near]: Controls how far objects can be away from the character and still be visible.
- Coll: [hotspt | camera | sound]: Although it's likely to change the way collisions work, this option doesn't seem to do anything now.
- TV mode: [ntsc | prog | pal]: Changes the video output between NTSC, Progressive and PAL, but the only apparent change in PCSX2 is a more consistent framerate when Progressive is set.
- 16:9 [on | off]: The same as the "Widescreen" option in the regular game menu.
- Screen [normal | split 2 | split 3 | split 4 | small]: Changes the camera mode. Selecting the split options in singleplayer will hard-lock the console (as they're intended for multiplayer), whereas "small" zooms the camera way out but turns up the FOV.
- Scene [#]: Press Cross to change the number, and Circle to attempt to play the cutscene for the loaded level with that ID number. If no cutscene for the level exists under that ID, a warning message pops up instead.
- Chunk [#]: Like above, press Cross to change selected chunk and Circle to load the selected chunk (and unload the current chunk). Warning; will NOT teleport Ratchet to that chunk, so you will more than likely fall to your death unless you set the Control Mode to cam+chr.
- Minor [off | on]: Forces the current segment into Minor mode. This is permanent, so reloading the level will have you enter the Minor segment as well.
- Dump [normal | normal2 | Filter | medium | high]: Used to dump a certain amount of debugging informating to a dev-kit, but doesn't work without that.
- Movie: [60fps | 30fps | 15fps]: Used to record gameplay footage in the selected framerate and send it to a dev-kit, but doesn't work without that.
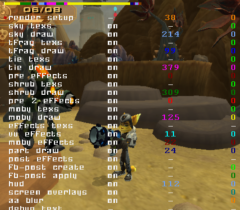
PROFILER
TBD - (off, bars, render, mobys, ties, shrubs, cpu/gpu, occl)
There are several modes this to this debugging overlay; they're all used to measure performance of certain aspects in the game
- off: Default. Nothing overlaid.
- bars: Creates a bar at the top screen which moves progressively towards the right as the game consumes more resources. Either due to a bug, or intentionally, only the CPU bar expands outwards (as it appears GPU debugging is disabled). The white line on the far right represents what the intended maximum was supposed to be to stay inside of the game's framerate. Each colour on the bar represents different systems and how much memory they're consuming. With exception to 'off', every other Profiler option contains the bar at the top.
-
render: Outputs four columns; the left set of numbers most likely measuring draw calls/render counts, whereas the right-most column always remains at 0, due to the GPU debugging issue. The red asterisk, the column full of "on" (which implies there's an off state for debugging those values) and text running off the screen may indicate there's supposed to be a way to scroll down the list and enable/disable options. It's most likely that these lines are in the same order that things are processed and rendered.
- render setup: Unknown, but cannot be switched off. Is being processed by the CPU.
- sky texs: Textures for the skybox. No CPU value.
- sky draw: How many calls are being made to process and render the skybox.
- tfrag texs: Textures used by Tfrags in the level. No CPU value.
- tfrag draw: How many calls are being made to process and render the active Tfrags in the level.
- tie texs: Textures used by TIEs in the level. No CPU value.
- tie draw: How many calls are being made to process and render the active TIEs in the level.
- pre effects: Most likely refers to some kind of pre-render effects, but unknown exactly what.
- shrub texs: Textures used by shrubs in the level. No CPU value.
- shrub draw: How many calls are being made to process and render the active shrubs in the level.
- pre 2 effects: Just like pre effects.
- moby texs: Textures used by mobys in the level. No CPU value.
- moby draw: How many calls are being made to process and render the active mobys in the level.
- effects texs: Textures used by the pre/post render effects. Both CPU and GPU counts are disabled.
- vu effects: Vector Unit effects? What?
- moby effects: Effects specifically applied to mobys.
- part draw: How many calls are being made to process and render active particles in the level.
- post effects: Calls for the post-rendering effects. Both CPU and GPU values are disabled.
- Fb-post create: "Fb" likely stands for "Frame Buffer", which is where the completed render is stored before it's sent to the monitor. Unknown what is actually being done at this stage.
- Fb-post apply: Same as above. GPU count only.
- hud: How many calls it's taking to process and render the HUD above everything else.
- screen overlays: Would relate to any effects which go over the top of the HUD and the rest of the rendered image. GPU counter only.
- aa blur: Anti-Aliasing, GPU counter only.
- debug text: The very debug text you're reading. Cannot be disabled, and both CPU and GPU counters are disabled.
DRAW
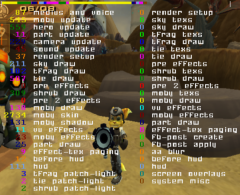
Adds overlays with useful debugging information (with one except, all these simply are off/on toggles). Many of these simply do not function, or behave in odd ways.
- Darken: This was most likely meant to darken the background to make debugging text easier to see, but it doesn't appear to work.
- Env coll: Doesn't appear to function; likely would have shown the collision meshes for environment objects in the world.
- Moby coll: Doesn't appear to function; likely would have shown the collision meshes for active mobys.
- Hero coll: Doesn't appear to function; likely would have shown the collision meshes for the player character.
- B spheres: Doesn't appear to function; likely would have shown the bounding spheres for objects in the world.
- Cameras: Unknown.
- Cuboids: Doesn't appear to work in this version, but would most likely have shown the cuboids for triggering enemy alert radii.
- Sample pts: Unknown.
-
Text: Creates 5 lines of white text at the bottom of the screen with the following information;
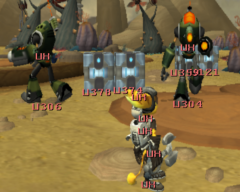
- HERO POS: {x0, y0, z0} {x1 y1}: Two different vectors for the player's location. The first is measured as float values (and is Ratchet's position from the origin), while the second is integer and does not include a z-axis (and is most likely a vector pointing towards some specific object in the level).
- CAM POS: {x, y, z}: The 3D Vector for the camera's current position.
- CAM ROT: {x, y, z}: The 3D Vector, in radians, for the camera's current rotation. Depending on the normal of what Ratchet is standing on (for when he is on spherical worlds or metallic surfaces), Ratchet's up/down rotation will be locked to 120 degrees (±1.05 radians in either direction).
- WORLD TIME: #: A constantly ticking up integer value that represents how much time the game has been active for since the level was loaded.
- XP: #: Shows a truncated display of the XP value in the debug menu (see below).
- UIDs: Displays the Unique IDentifiers for object instances in the world, prefixed with 'u' (salmon colour). Many objects (such as Ratchet and his ship) are marked as "UX", purpose unknown.
- Moby Num: Displays another set of identifier numbers over any mobys, prefixed with 'o' (blue colour).
- Groups: Displays yet another set of identifier numbers over objects which indicate their "grouping", with the prefix 'g' (green colour). Ratchet, his ship, vendors and other objects are often marked as 'g255'.
- Interp: May have been intended to display splines that objects use to interpolate between positions, but it doesn't seem to do anything in this build.
- Tuning [off | black | white | blue]: Adds tuning debugging info in the specified colour. See the "Tuning" section for more info.
- Sky: Unknown.
- Sound: Unknown.
MINING
The Mining System is used in Minor segments to prevent players from farming for bolts when they re-enter a segment, to encourage players progressing and moving forward with the game. When Mining is active (by collecting a bolt in a Minor segment), some additional debugging information is added in a couple places.
Firstly, a simple text display is added at the bottom of the screen; this appears in-game, in-cutscene and in the pause menu, but not in sub-menus or in the debug menu. When first activated, it will generally look something like this;
0 / 0:01 = 0 (5)
The actual formulas for deciding what amount of bolts are more complex than this, but the goal of the mining system is to reduce the number of bolts available to you over time. The formula displayed can be broken down into;
Amount Mined / Time Spent Mining = ???
TBD, it's all just theory and speculation now. (Notes below)
- The Mining System appears to be designed to reduce the amount of bolts and/or experience you get from revisting previously completed worlds, maybe to prevent grinding? The problem is that while all the numbers tick away, it's not clear at all what the underlying math is, or what exactly it's trying to do.
- Only appears when you replay a level (revisiting the planet) and collect a bolt. At this point, the timer will activate.
- Is per-planet, but on an individual planets the counters are never reset (so if you did 14 minutes of mining and then fly back, the timer is still at 14 minutes)
- When mining counter first appears, it starts at
0 / 0:01 = 0 (5)
- The timer freezes after idling for a certain amount of time
- [Unrelated] Hero Seg may be actually relating to either the current "difficulty level" or how many boxes are being placed?
TUNING
TBD, it's all just theory and speculation now. (Notes below)
-
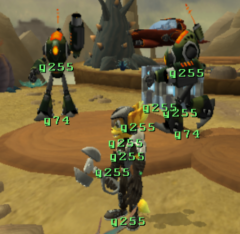
Like text, adds some lines of debugging information to the screen. The option sets the colour of the text. Tuning also enables both the UIDs display (but in the colour of Tuning text and ONLY for enemies), as well as an additional bit of text under the UIDs (purpose unknown, known values include "*0Ae", "*0A-", "*0Be", "*0C-", "*0Ce", "*0Ch", "*0Cm", "3A-" or "0i"). While Tuning is enabled, the debug lines shown by the "Text" option are hidden, regardless of if "Text" is enabled or not. The debugging information that appears also is dependant on if "mining" has been enabled (see the "Mining" section);
- Max Wage: (Mining Only) Unknown. Value remains static once you load into a level, but is different for each level.
- Amt Mined: (Mining Only) The amount of bolts collected when mining is active.
- Time Mining: (Mining Only) A timer that displays how long since mining has been active.
- Mining: (Mining Only) Unknown. Seems to be a multiplier hardcoded between 0.5 and 5.0, but not sure how it's used.
- XP Deficit: If an enemy falls into an unreachable area, normally their XP and Bolts would be lost forever. The game tracks when this happens and stores how many points they were supposed to award you, making it up over the next couple of times you make gains. XP Deficit never seems to increase, however, most likely because the system automatically awards you the XP rather than waiting for you to kill another enemy.
- Bolt Deficit: Same as above, but also takes into consideration crates (but not other breakables). This value does correctly increase and decrease as you make bolt gains.
- Current XP: Unknown, as this doesn't not correlate to the player's actual XP amount as displayed in the Text->XP message.
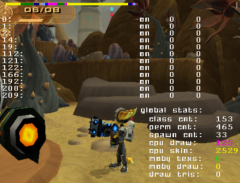
- Enemies: #/ #: A display of the amount of "enemies" (including explosive boxes left in the level. The right side represents the total spawned, while the right represents the maximum amount of enemies available (independent of difficulty tuning). Killing an enemy reduces both values.
- Crates: #/ #: Same concept as above, but this is specifically for health crates.
- Showing: Unknown. Seen values such as '-1', '0', 'C', 'min' and 'h' listed, but as to what they refer to, I'm not sure.
- Hero Seg: This seems to change as you get to different parts of the level, and is always in the format of a number followed by either "min", "maj" or "cmp".
MISC
Some additional controls to affect how the game works.
- Ratchet HP [#]: If this is set higher than Ratchet's current HP, will play the Nanotech Increase effect and message, but otherwise does nothing and will reset when you reopen the Debug menu.
- Bolts [#]: Either adds or subtracts bolts from Ratchet (functions correctly).
- XP [#]: Adds or subtracts .1 of a point to Ratchet's current XP (functions correctly, untested if you go under the amount needed for a previous level). This value matches (minus the decimal part) the XP value for the Draw->Text option.
- Raritanium [#]: As this game has no Raritanium, appears to have no affect.
- Battle cam [off | on]: Unknown.
- Actuator [on | off]: Unknown.
- Add sample [no]: Refers to the audio system, but doesn't appear to work.
- Add start [no]: Refers to the audio system, but doesn't appear to work.
FOG
These controls don't appear to function, but should control fogging.
- Near dist [x]
- Near int [x]
- Far dist [x]
- Far int [x]
- Color R [x]
- Color G [x]
- Color B [x]
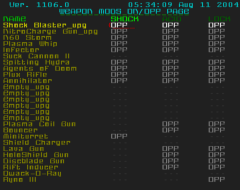
WEAPON DEBUG PAGE
This page is one giant table for every weapon in the game (ignoring the wrench). 6 slots are empty, but may be linked to the multiplayer weapons rather than deleted/hidden content.
The headers for the table are;
- NAME: The name of the weapon. Duh.
- UPG: The current level of the weapon. '0' indicates that a weapon has not been purchased yet. Pressing the Circle button will let you increase level (and unlock a weapon if not already bought), while Cross will decrease.
- AMMO: How much ammo that player has for that weapon.
- DMG: A float value that somehow represents the amount of damage each weapon does.
- HP2: Unknown.
- HP1G: Unknown.
- HP2G: Unknown.
As a warning, if you enable a weapon by setting its UPG value to above zero, it will not show in the Quick-Select or Weapons menu. Some of the weapons do not have sounds.
GADGET XP PAGE
Despite the name, specifically represents how much experience each weapon has. This menu is nothing more than a list of names and float values.
LOAD LEVEL PAGE
A list of levels in the game and their IDs. Selecting an option with the Square button will warp you to that planet as if you had used your ship to go there. For this version, every level from Daxx onwards is not included, so will crash the game.
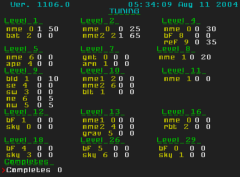
TUNING PAGE
Speculation is that these are special properties as needed for individual levels, that didn't have an appropriate place in the other menus to be displayed when debugging/testing. Also contains a "Completes" value, with no known effect.
WEAPON MODS PAGE
For each of the weapons in the game, allows you to enable/disable the Shock, Acid and/or Lock-On mods, but only for weapons that can take those addons (for example, the Qwack-O-Ray cannot use any of them).
SPACE COMBAT PAGE
Like raritanium above, a hold-over from Ratchet & Clank 2 that lets you enable/disable special parts for your ship, but goes completely unused in this game.
RC2HUD TWEAKS N' SETTINGS PAGE
Contains two settings for controlling HUD functionality, which can be turned on and off.
- QSEL PAUSE: Does the game pause while holding open the Quick-Select menu? Enabled by default.
- IGE DEBUG: When enabled, prints some garbage to the screen (it's likely the font used in R&C2 was not included). Ratchet's movement is paused, but everything else (including the camera) moves. Disabled by default.
RC3 CHALLENGE MODE PAGE
Sets your current Challenge Mode level. You need to press the Circle button to increase this number, and the Square to decrease it. While it does have an effect on how much damage enemies do to you and how much damage enemies can take (after saving and reloading), there's no bolt multiplier and the save file doesn't include the number.
RATCHET ARMOR PAGE
Allows you to set what armour Ratchet is wearing. Despite the tool tip, there are 4 armour levels instead of 3. Instead of using the normal Cross/Triangle, you need to use the left/right directions to switch this number.
CAM FLY BY PAGE
If you press the 'X' button, this is supposed to play a short camera fly-by animation, but only if one exists for the level (a red message will appear if it doesn't exist).
FONT PROPERTIES PAGE
Neither of these options seem to have any effect, and it's not known if these should affect the Debug Menu or the in-game font.
- Drop: ??
- Scale: ??
POST EFFECTS PAGE
Allows you to control how post processing effects render.
- Bloom copy tint R: ??
- Bloom copy tint G: ??
- Bloom copy tint B: ??
- Bloom copy tint A: ??
- Bloom apply 1 A: ??
- Bloom apply 2 A: ??
- Bloom show 1 [off | on]: When enabled, and if there is bloom in the rendered view, creates a small black window in the bottom-right corner. As you move your camera about, any bloom effects will be displayed in the box. This is likely to help isolate issues with the bloom lighting when debugging. [!!! GRAB SCREENSHOT !!!]
- Bloom show 1 [off | on]: When enabled, and if there is bloom in the rendered view, creates an even smaller, static texture map in the corner. [!!! GRAB SCREENSHOT !!!]
- Arcade effect strength: ??
LEVEL TRANSITIONS PAGE
Lets you debug the ship transition screen when going to a different planet.
- Level From: Which planet you are coming from.
- Level to: Which planet you will warp to.
- Show transition: Plays the transition based on the numbers you entered above. Will actually warp you to the selected planet.


- Lind Whisperer and Shadowblaze
-
 2
2
2 Comments
Recommended Comments
Please sign in to comment
You will be able to leave a comment after signing in
Sign In Now